Build Your Dream Woodworking Bench: A Step-by-Step Guide
Hey there, fellow woodworkers! So you're thinking about building your own workbench? Fantastic! There's nothing quite like the satisfaction of crafting a tool that will help you craft so many other things. This isn't just a bench; it's an investment in your woodworking journey. This guide will walk you through building a sturdy, versatile workbench perfect for any workshop, regardless of size. We'll break it down step-by-step, making it manageable even for beginners. Grab your coffee, let's get started!
Planning Your Perfect Bench
Before we jump into the sawdust, let's plan our masterpiece. Think about how you'll use your bench. What kinds of projects will you be tackling? A bench for intricate jewelry boxes will have different needs than one for building massive furniture.

Choosing Your Wood
This is a big one. Hardwoods like maple, oak, or beech are ideal for durability and resistance to dents and scratches. They're pricier, but worth it in the long run. Softwoods like pine or fir are more budget-friendly but might need more reinforcement. Consider your budget and the type of work you'll be doing. Don't forget to check your lumber for knots and warping; you want straight, clean boards for a solid bench.
Dimensions and Design
There's no one-size-fits-all answer here. A good starting point is a bench around 24-36 inches wide and at least 6-8 feet long. Think about your workspace and how much room you have. Height is crucial too – aim for a height that's comfortable for you, usually around waist height. You can easily adjust this based on your own preference. We'll be building a classic, robust design, but feel free to customize!
Gathering Your Tools
Before you even start cutting, make sure you have all your tools ready. You'll need the basics:
- Measuring tape
- Pencil
- Circular saw (or hand saw – it'll take longer, but it's doable!)
- Drill with various drill bits
- Screwdriver (or impact driver – a game-changer!)
- Clamps (lots of them!)
- Safety glasses
- Hearing protection
- Wood glue
- Wood screws (various sizes)
- Level
- Chisel (optional, but handy)
- Sandpaper (various grits)
Having all your tools organized and within easy reach will save you time and frustration.
Building the Benchtop
Let's start with the heart of the workbench – the top! This section will detail building a strong and durable benchtop.
Creating the Frame
Start by building a sturdy rectangular frame from your chosen lumber. Use strong, long boards for the sides and shorter ones for the ends. Make sure the corners are square and secure using wood glue and screws. Remember to pre-drill your screw holes to prevent the wood from splitting.
Laying the Top Boards
Once the frame is solid, it's time to add the top boards. Arrange them evenly across the frame, leaving a small gap between each board for expansion and contraction. Use more wood glue and screws to secure them to the frame. Tightly clamping the boards while the glue dries is essential for a solid top.
Finishing the Top
After the glue is dry and everything is secure, it's time to sand the top. Start with a coarser grit sandpaper and gradually move to finer grits for a smooth finish. You can then choose to apply a finish, like varnish or polyurethane, to protect your benchtop from wear and tear.
Building the Base
Now for the support structure. A sturdy base is critical to the functionality of your bench. We're going for a classic leg-and-stretcher design.
Constructing the Legs
Cut your legs to the desired height. Remember, comfort is key! Make sure they are perfectly square and plumb. If you have a woodworking vice, it might be helpful to use it to hold everything in place while working with the screws.
Attaching the Stretchers
These horizontal supports connect the legs, adding incredible strength and stability. Attach them using wood glue and screws. Ensure that the stretchers are level and evenly spaced.
Attaching the Base to the Top
Carefully lift the benchtop and place it on top of the assembled base. Use screws from the underside to attach the top to the base. Pre-drilling is crucial here to prevent cracking.
Adding Extra Features (Optional)
Want to take your workbench to the next level? Here are some optional additions:
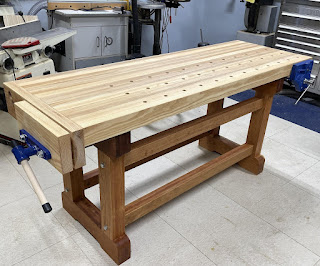
- Vises: A front vise is a game-changer for clamping down workpieces. Consider adding a tail vise to the back as well.
- Dog holes: These holes allow you to use bench dogs for clamping and securing work.
- Shelves: Add shelves for extra storage.
- Drawers: Built-in drawers provide even more storage capabilities.
Finishing Touches
Once your bench is assembled, take the time to sand any rough edges and apply a final finish. A coat or two of varnish or polyurethane will protect your wood and make it easier to clean.
Commonly Asked Questions
Q: What kind of wood screws should I use? A: Use exterior-grade wood screws, as they are more resistant to moisture.
Q: How important is it to use a level? A: Very important! A level bench is essential for accuracy and safety.
Q: Can I build this bench without power tools? A: Yes, but it will require more time and effort. Hand tools are perfectly capable of creating a sturdy workbench, just expect the process to take significantly longer.
Q: What's the best finish for a workbench? A: It depends on your preferences and the type of work you'll be doing. Polyurethane is a popular choice for its durability and water resistance.
Q: How long does it take to build this bench? A: This depends on your skill level and the tools you're using. Expect to spend anywhere from a weekend to a few weeks.
And there you have it! You've now got the knowledge and the plan to build your very own woodworking bench. Remember to take your time, enjoy the process, and don't be afraid to make adjustments to fit your needs. Happy building!


No comments:
Post a Comment